
DSL-2750B USB Functions for Windows 7
USB Functions for Windows 7
Getting Started
Position the DSL-2750B in your desired location, and connect the power cable to the rear of the device. From the ADSL micro filter device that provides the separated telephone and ADSL cables, connect the ADSL one to the grey socket marked DSL also on the rear of the device. Finally, connect a network cable from one of the yellow LAN sockets on the rear of the device to the LAN socket on your computer. It is recommended that you configure the device whilst connected via cable. If you are planning to use the device via the Wireless, set up first your LAN network and your Wireless connection whilst connected via cable. You can then configure the Internet connection via Wireless.
Open the Network and Sharing Centre on your PC and on the left-hand side of the window, click on Change Adapter Settings. Your installed network adapters should now be visible. The Ethernet cable adapter will be called Local Area Connection. If you are using one, there will be another connection labelled Wireless Network Connection. If either is greyed out, right-click and on the menu that appears, left-click on Enable. You will likely only need one enabled at any one time.
Single-left-click on the Local Area Connection and then right-click and select Properties from the menu that appears. In the box that then appears, look for Internet Protocol version 4 (TCP/IPv4) and double-left-click on it. The new box that appears is where you can configure the LAN address settings of your computer. For IP Address and DNS Servers you should select Obtain Automatically. Click Accept (this will close the window) and Accept again on the Local Area Connection properties window (which will close). Your network settings will now be updated.
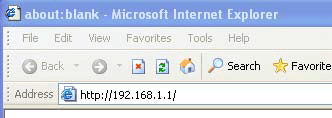
To access the configuration pages on your device, open a web browser, and in the address bar type the IP address of the DSL-2750B (default address is 192.168.1.1).
Log in (default User: admin; default Password: admin), and go to Setup -> LAN Setup
USB Functions
The USB socket on the rear of the device can be used with a storage device (pen drive, external hard drive) which will allow you to share the storage device with anybody on your network, and can also allow access to it from outside your network. You can also connect a USB Printer to the socket, which will enable the printer to be shared between all computers on the network.
Go to Setup -> USB Setup
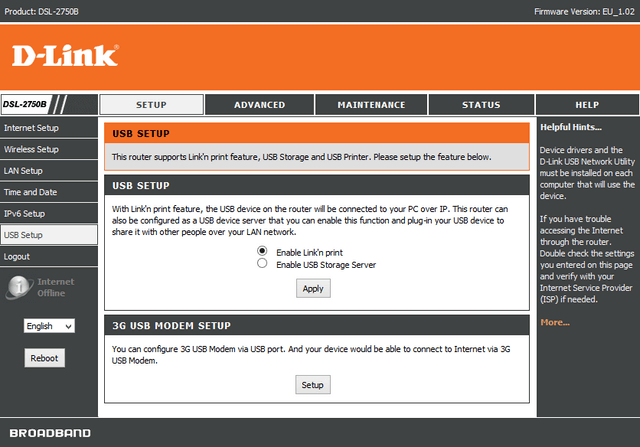
USB Printer
To connect and share a USB printer over the network, you need to click on Enable Link ‘n Print and then click on Apply. Connect your printer, and Reboot the DSL-2750B.
You will then need to install the printer driver and the D-Link on each computer that requires access to the printer.
USB SETUP - STORAGE SERVER
Attaching a USB Storage Device to the USB port on the rear of the DSL-2750B enables you to use it as Network Attached Storage. Any computer on your network can access it, and you can set it to be accessible from a remote location. There are 3 ways to access the USB storage device:
SAMBA File Server: use this to access the storage device from within your local network – you can add the device as a folder or network drive within Windows.
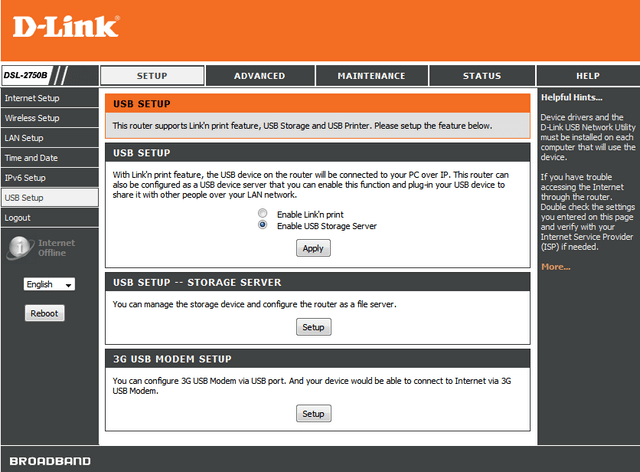
Go to Setup -> USB Setup.
- Attach your Storage Device. Click Enable USB Storage Server. You may see a pop-up box warning you that this will disable Link’n Print. Click OK. Click Apply.
- Under USB SETUP -- STORAGE SERVER, click Setup.
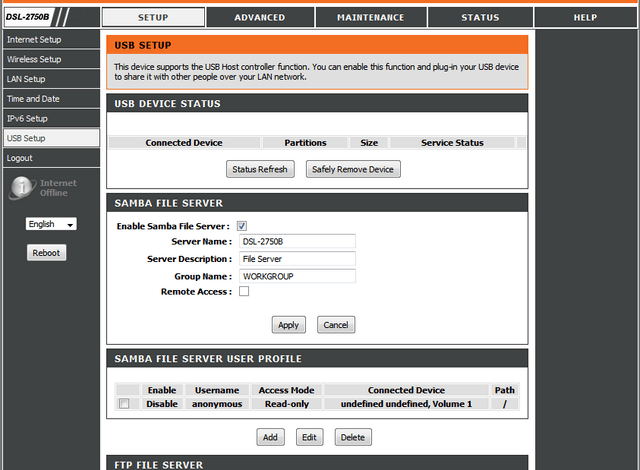
Under USB Device Status the connected device is shown (in the image the attached device is a Kingston DataTraveler 8Gb USB stick).
- Under SAMBA FILE SERVER, tick Enable Samba File Server. The Server Name, Server Description and Group Name should be already filled in (the Group Name is the Workgroup name in Windows, and will need to be the same as your Windows workgroup name for you to be able to access it). The Remote Access box should be left unticked.
- Click Apply.
- Under SAMBA FILE SERVER USER PROFILE, you will now see a listing for the USB Storage Device. Tick the box on the left of it and click Edit.
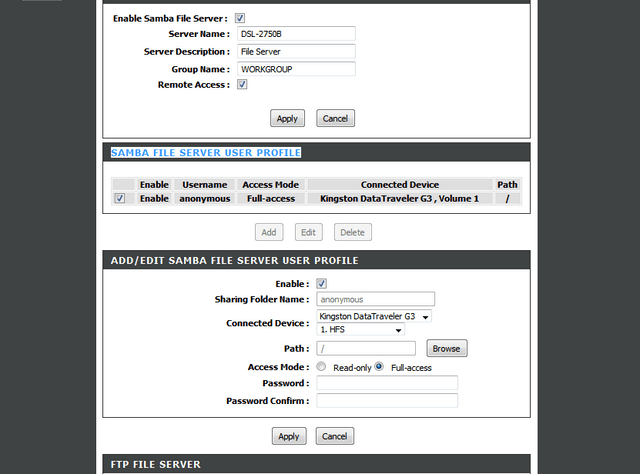
- Ensure that Enable is ticked, under Access Mode select if you want the USB Storage Device to be Read-only or if you want Full-access (able to read and write files to the device).
- Enter a Password.
- Click Apply.
- In Windows, open My Computer, go to Network, right-click on it and select Map Network Drive. In the window that appears, pick a drive letter and in the Folder box enter the IP Address of the DSL-2750B (default is 192.168.1.1) like this:
\\192.168.1.1\
- Click the Browse button next to it.
- In the Browse For Folder window that appears, you will see the folders in the USB Storage Device. Select the first one, just under the IP Address (should be called anonymous) and click Accept.
- Click OK.
You should now see the contents of the USB Storage Device as an attached network drive under Computer. You will need to create the link in Windows on each computer in your network to be able to access it.
When you want to disconnect the USB device, make sure that nobody is accessing it (you can right-click on it in Windows and select Disconnect Network Drive). On the USB Storage Setup page under USB Device Status, click Safely Remove Device. Wait for the page to reload, and you should see that it has disappeared. You can now safely unplug the device from the DSL-2750B.
NOTE: if you do not follow the above procedure, files being written to or read from the device may become corrupted.
The second method is: FTP File Server. FTP stands for File Transfer Protocol, and is a simple method for accessing files on the USB Storage Device:
- Under FTP File Server tick Enable FTP Server.
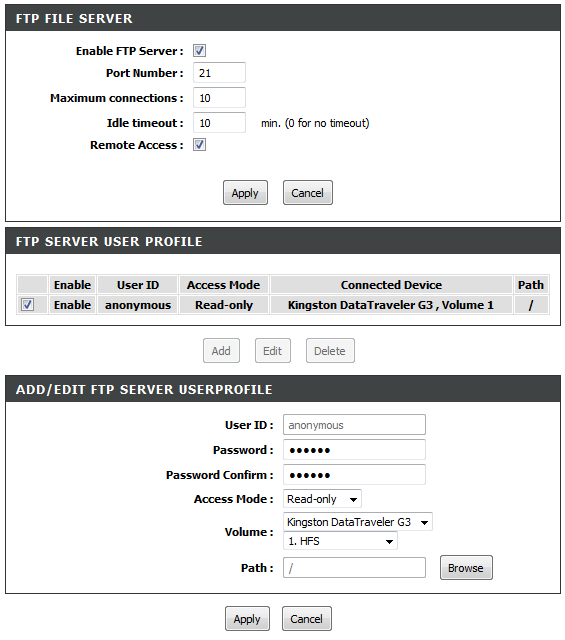
- Select the Port Number (default for FTP is 21), Maximum Connections (number of downloads possible at the same time) and Idle Timeout (time in minutes before idle connection is closed). Tick Remote Access for accessing your files via FTP from the Internet.
- Click Apply.
- After you click Apply, an FTP User Profile will appear underneath. Tick the box to the left and then click Edit. Here you can set the User ID (in the default profile this is set to 'anonymous' and cannot be changed. You can add another profile with your chosen ID), Password, Access Mode (Read-only or Full-access), Volume (device and partition. There will only be one device, but if you have more than one partition on the device, you can choose which to allow access to) and Path (clicking Browse here enables you to allow access only to a specific folder on the selected partition. Selecting the folder with no name (the Root folder) grants access to all of the folders on the partition).
- Click Apply.
- Click Reboot.
To test, you can enter the default IP Address of the DSL-2750B into the address bar of your web browser like this:
![]()
And your web browser will display the files on your storage device like this:
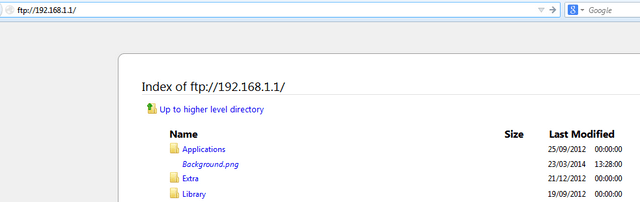
You can use the External (WAN) IP Address of your DSL-2750B to access the files remotely via FTP - use the same IP Address format as the example above, substituting the IP Address above for the DSL-2750B's External (WAN) IP Address. If you want to upload files to the storage device via FTP, you will need to use an FTP Client program.
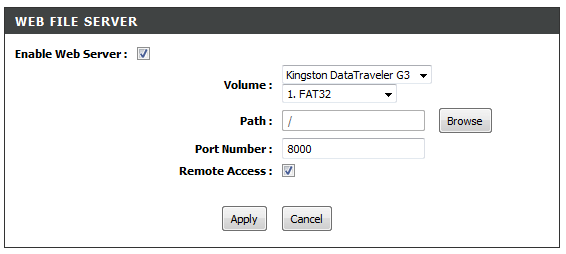
The third method is Web File Server. This is a simple FTP-style method that allows you access to files already on the storage device, but you will only be able to download, not upload.
- Click Enable Web File Server. Select the Disk and Volume, the Path if you want to specify a folder to enable access to, note the Port Number (default is 8000) and tick Remote Access if you want to access from the Internet (in the address bar of your web browser write the WAN IP of your DSL-2750B and add :8000 directly after the last number in the IP Address.
- Click Apply.
These may also help:
- DSL-2750B Port forwarding for Windows 7 Read Answer
- DSL-2750B router Wireless Setup for WINDOWS 7 Read Answer
- DSL-2750B Internet Setup for Windows 7 Read Answer
- DSL-2750B LAN Setup for Windows 7 Read Answer
- DSL-2750B Parental Control for Windows 7 Read Answer
- How to open ports on the DSL-2750B? Read Answer