
How to Optimise Wireless Settings DWC-1000 - FW.4.4.x
Minimal Conditions:
• DWC-1000 with firmware version: 4.4.0.x or higher
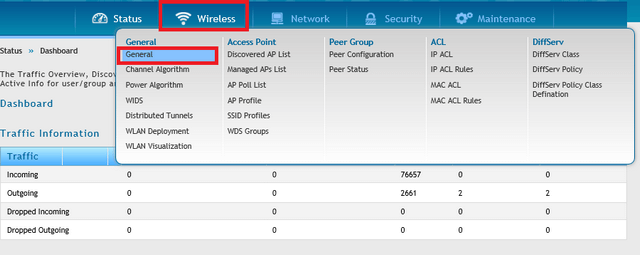
Step 1 – Log into the DWC-1000 and go to “General”
Wireless > General
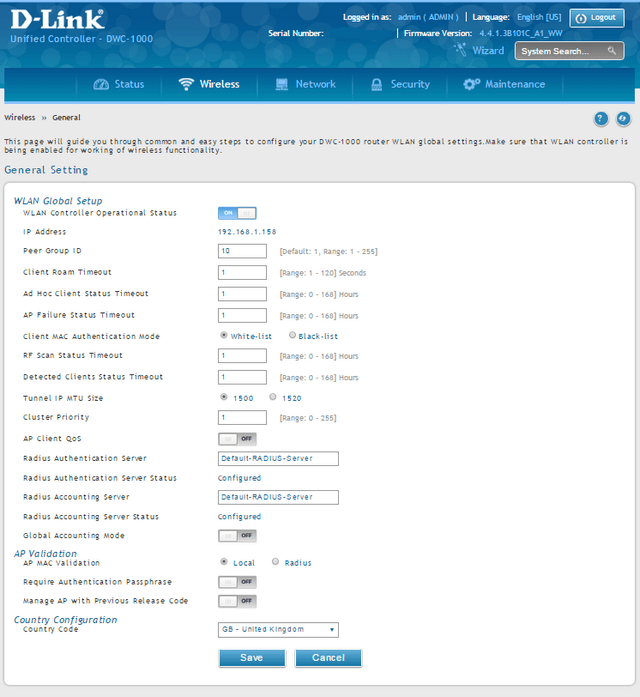
Client Roam Timeout: 1
Ad Hoc Client Status Timeout: 1
AP Failure Status Timeout: 1
RF Scan Status: 1
Detected Clients Status Timeout: 1
Click “Save”
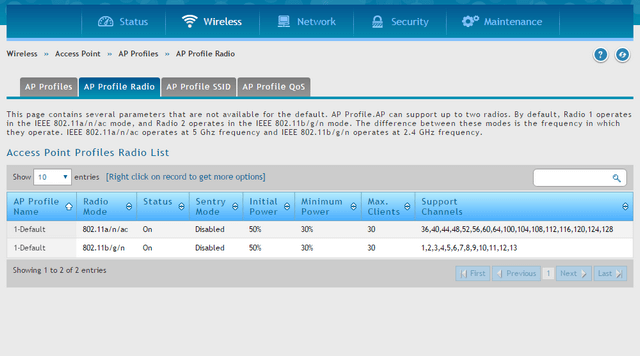
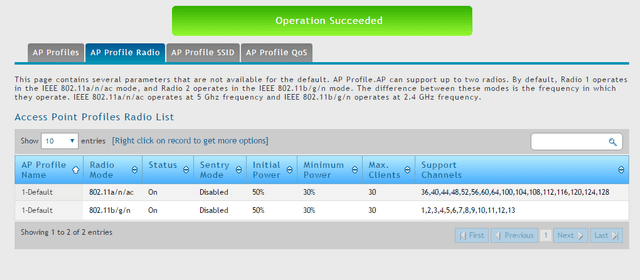
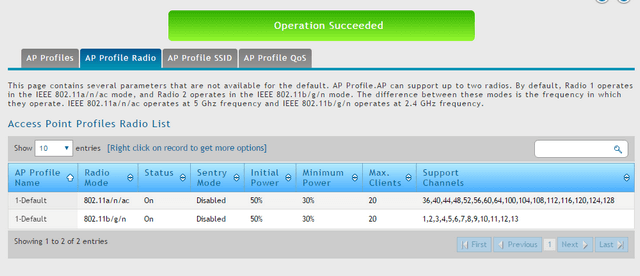
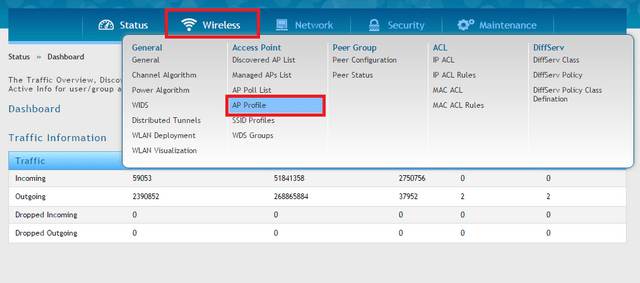
Step 2 – Go to “AP Profile”
Wireless > Access Point > AP Profile

Once you see the below menu, you can configure the settings per radio…
Step 3 – Optimize 5 GHz Band / Radio:
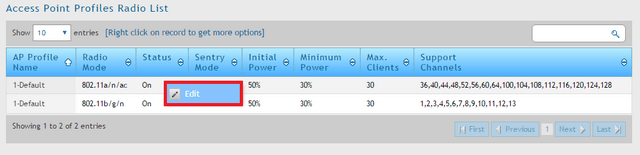
Right-click over 1-Default 802.11a/n/ac (Radio 1) then click “Edit”
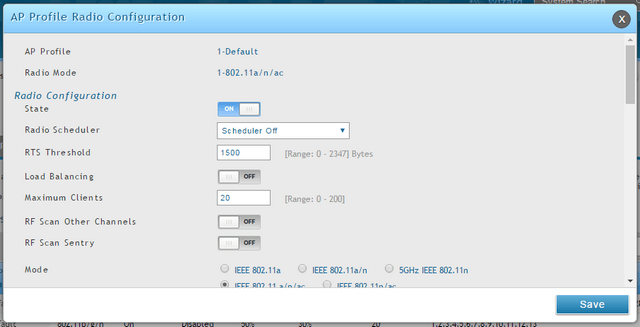
RTS Threshold: 1500
Maximum Clients: 20
RF Scan Other Channels: OFF
Scroll down…
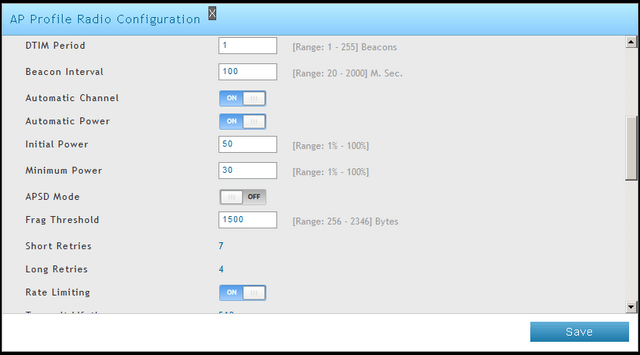
APSD Mode: OFF
Frag Threshold: 1500
Rate Limiting: ON
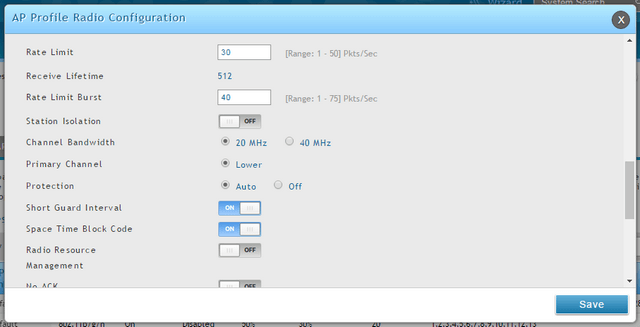
Scroll down…
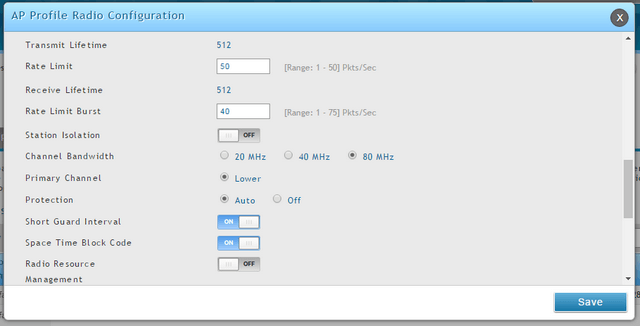
Rate Limit: 30
Rate Limit Burst: 40
Channel Bandwidth: 80MHz
Radio Resource Management: OFF
Scroll down…
Click “Save”
Step 4 – Optimize 2.4 GHz Band / Radio:
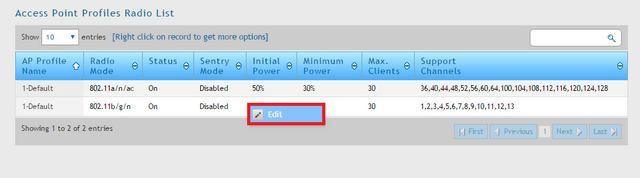
Right-click over 1-Default 802.11b/g/n (Radio 2) then click “Edit”
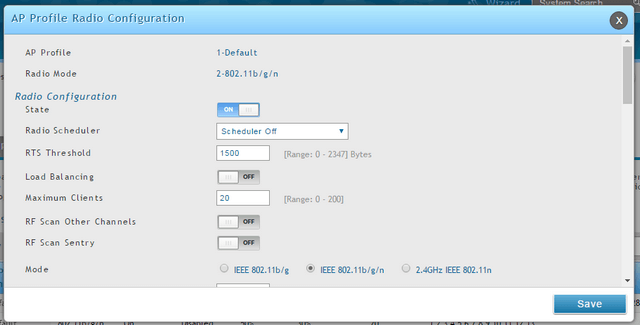
RTS Threshold: 1500
Maximum Clients: 20
RF Scan Other Channels: OFF
Scroll down…
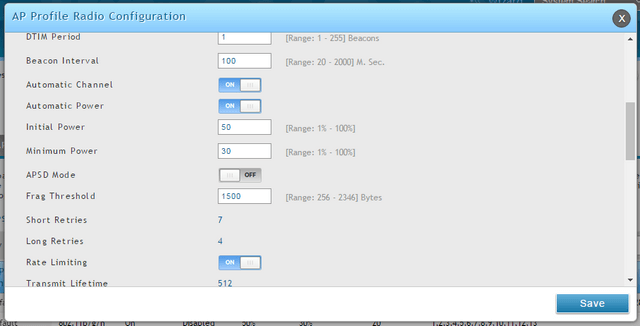
DTIM Period: 1
Initial Power: 50%
Minimum Power: 30%
APSD Mode: OFF
Frag Threshold: 1500
Rate Limiting: ON
Scroll down…
Rate Limit: 30
Rate Limit Burst: 40
Channel Bandwidth: 20MHz
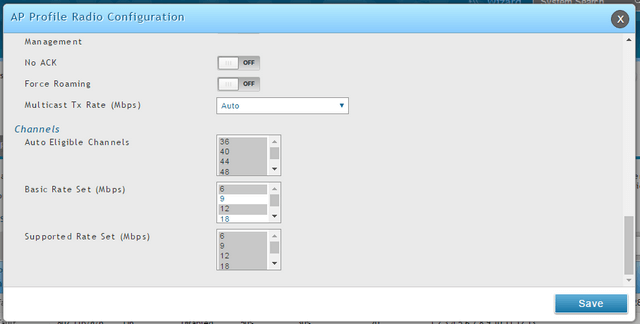
Radio Resource Management: OFF
NOTE: That possibly in roaming behaviour the “Force Roaming” to be ON
Scroll down…

Click “Save”
Step 5 – Optimization when using WPA2-AES Encryption – Go to “Security”
Wireless > AP Profile
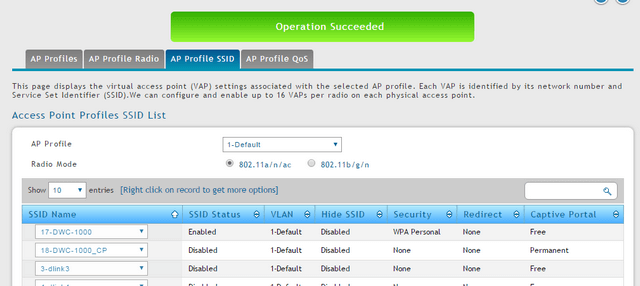
Click “AP Profile SSID”
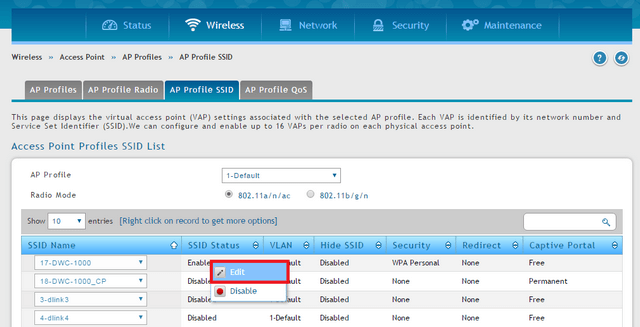
Right-click over the SSID (select accordingly) and click “Edit”
Scroll down to “Security”
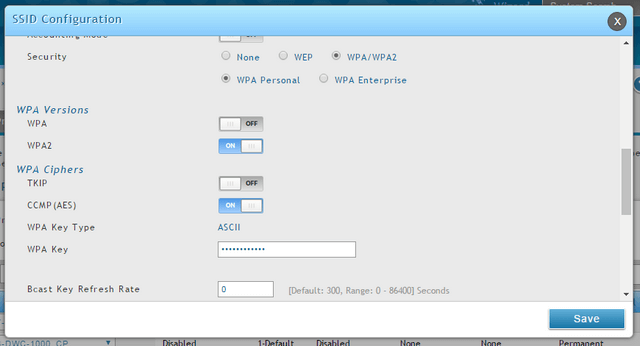
WPA/WPA2: Click to select
WPA Versions:
WPA: OFF
WPA2: ON
WPA Ciphers:
TKIP: OFF
CCMP(AES): ON
Broadcast Key Refresh Rate: 0
Click ”Save”
Step 6 – Apply the above changes to the profile go to “AP Profiles”
Wireless > Access Point > AP Profiles
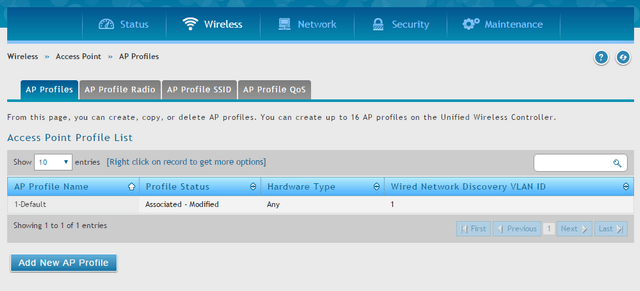
When you make changes, you should notice as per above “Associated-Modified”

Right-click over 1-Default and click “Apply”.
Click the refresh button as per below to update the “Profile Status” column

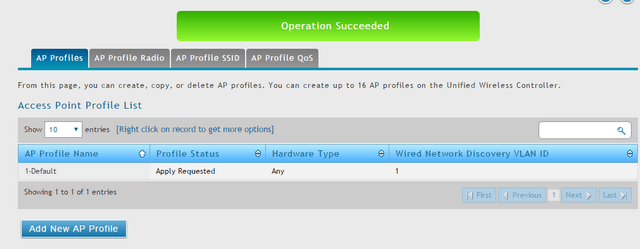
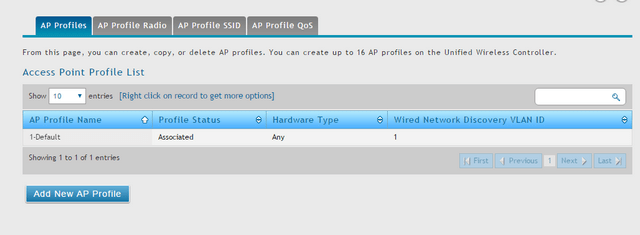
Once you see the above status as “Associated”, this means that ALL new configuration settings have been sent successfully to ALL managed APs
Step 7 – The final stage to make sure the “Power & Channel” settings are appropriate for RF Management. To do this go to “Channel Settings”
Wireless > General > Channel Algorithm > Channel Algorithm 5 GHz

Channel Plan Mode: Interval
Click “Save”
Wireless > General > Channel Algorithm > Channel Algorithm 2.4 GHz
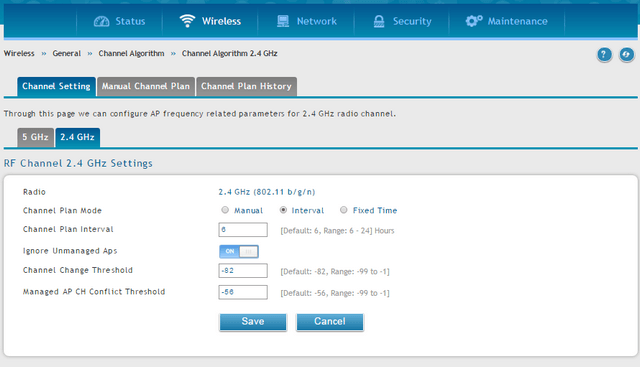
Channel Plan Mode: Interval
Click “Save”
Once above is completed, go to “Power Setting”
Wireless > General > Power Adjustments > Power Setting
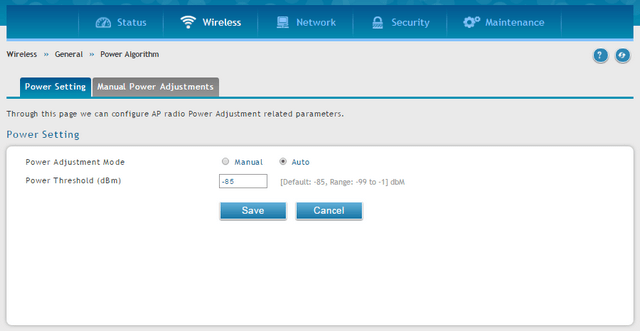
Power Adjustment Mode: Auto
Click “Save” - The configuration is now completed.
• DWC-1000 with firmware version: 4.4.0.x or higher
Step 1 – Log into the DWC-1000 and go to “General”
Wireless > General
Client Roam Timeout: 1
Ad Hoc Client Status Timeout: 1
AP Failure Status Timeout: 1
RF Scan Status: 1
Detected Clients Status Timeout: 1
Click “Save”
Step 2 – Go to “AP Profile”
Wireless > Access Point > AP Profile
Once you see the below menu, you can configure the settings per radio…
Step 3 – Optimize 5 GHz Band / Radio:
Right-click over 1-Default 802.11a/n/ac (Radio 1) then click “Edit”
RTS Threshold: 1500
Maximum Clients: 20
RF Scan Other Channels: OFF
Scroll down…
APSD Mode: OFF
Frag Threshold: 1500
Rate Limiting: ON
Scroll down…
Rate Limit: 30
Rate Limit Burst: 40
Channel Bandwidth: 80MHz
Radio Resource Management: OFF
Scroll down…
Click “Save”
Step 4 – Optimize 2.4 GHz Band / Radio:
Right-click over 1-Default 802.11b/g/n (Radio 2) then click “Edit”
RTS Threshold: 1500
Maximum Clients: 20
RF Scan Other Channels: OFF
Scroll down…
DTIM Period: 1
Initial Power: 50%
Minimum Power: 30%
APSD Mode: OFF
Frag Threshold: 1500
Rate Limiting: ON
Scroll down…
Rate Limit: 30
Rate Limit Burst: 40
Channel Bandwidth: 20MHz
Radio Resource Management: OFF
NOTE: That possibly in roaming behaviour the “Force Roaming” to be ON
Scroll down…
Click “Save”
Step 5 – Optimization when using WPA2-AES Encryption – Go to “Security”
Wireless > AP Profile
Click “AP Profile SSID”
Right-click over the SSID (select accordingly) and click “Edit”
Scroll down to “Security”
WPA/WPA2: Click to select
WPA Versions:
WPA: OFF
WPA2: ON
WPA Ciphers:
TKIP: OFF
CCMP(AES): ON
Broadcast Key Refresh Rate: 0
Click ”Save”
Step 6 – Apply the above changes to the profile go to “AP Profiles”
Wireless > Access Point > AP Profiles
When you make changes, you should notice as per above “Associated-Modified”
Right-click over 1-Default and click “Apply”.
Click the refresh button as per below to update the “Profile Status” column
Once you see the above status as “Associated”, this means that ALL new configuration settings have been sent successfully to ALL managed APs
Step 7 – The final stage to make sure the “Power & Channel” settings are appropriate for RF Management. To do this go to “Channel Settings”
Wireless > General > Channel Algorithm > Channel Algorithm 5 GHz
Channel Plan Mode: Interval
Click “Save”
Wireless > General > Channel Algorithm > Channel Algorithm 2.4 GHz
Channel Plan Mode: Interval
Click “Save”
Once above is completed, go to “Power Setting”
Wireless > General > Power Adjustments > Power Setting
Power Adjustment Mode: Auto
Click “Save” - The configuration is now completed.
Ceci peut également aider.
- Comment effectuer une procédure de récupération de mon DWC-1000 ? Lire la réponse
- Comment configurer un portail captif avec un compte personnel sur mon DWC-1000 ? Lire la réponse
- Comment mettre à jour le firmware des points d'accès avec le DWC-1000 ? Lire la réponse
- How to Add Access Point and Configuration of Profiles in the DWC-1000 – FW-4.4.x Lire la réponse
- How to Create Multi-SSIDs and VLANs - FW.4.4.x Lire la réponse
- How to create captive portal on DWC-1000 – FW.4.4.x Lire la réponse
- Comment mettre à jour le firmware des APs avec le DWC-1000 (fw 4.4.X min) Lire la réponse