
DGS-1510 Series How to Configure Stack Order and Priority
In this document we will modify the ID of a switch belonging to the stack as well as its priority.
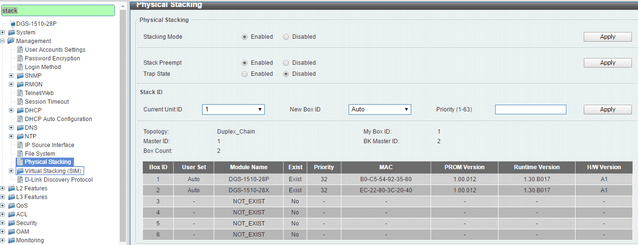
Step 1 – When two devices are stacked (as shown below), we can see that the Master is the DGS-1510-28P with ID: 1, if we want to change the ID of the unit and re-assign from "Current Unit ID and New Box ID ", go to switch configuration
Management > Physical Stacking
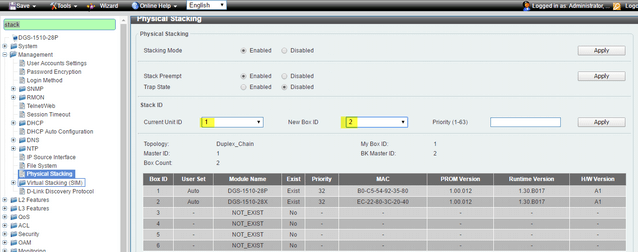
For example, if you want to change the ID DGS-1510-28P to the ID:2, select the current unit ID:1 (current unit ID) and as the new ID, ID:2 in the "New Box ID" option and click “Apply” to save the changes (Note: The ID of the unit will be applied after a reboot).
To restart the system enter the top menu:
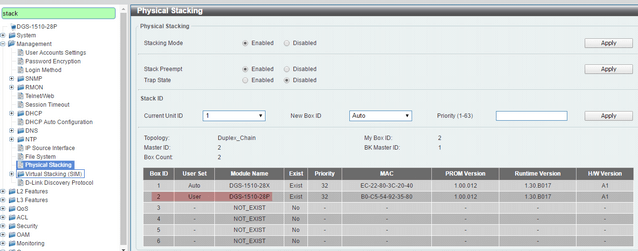
Tools > Reboot System – Select “Yes” to save changes and click “Reboot”. After reboot, the DGS-1510-28P is assigned to the ID Box 2.
Step 2 - Change priority:
We can also change the priority in the field "Priority” of ID of member, the unit with the best priority will be elected as the master device. A low value means the highest priority. For example; when two switches have equal priority unit, the lowesr MAC address, will have the highest priority. Therefore, the DGS-1510-28P with the lowest MAC: B0-C5-54-92-35-80 .It will become the master device. The DGS-1510-28X will convert into the slave device.
Note: The default priority value is 32, Please check the screenshot below:
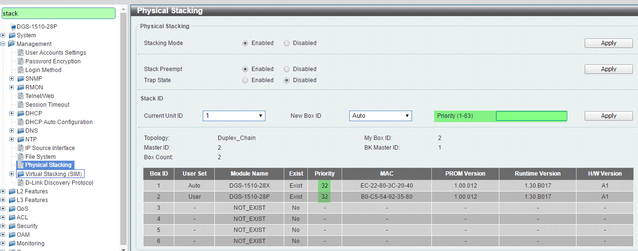
Click “Apply” to save the changes and remember to restart for the changes to take effect.
Step 1 – When two devices are stacked (as shown below), we can see that the Master is the DGS-1510-28P with ID: 1, if we want to change the ID of the unit and re-assign from "Current Unit ID and New Box ID ", go to switch configuration
Management > Physical Stacking
For example, if you want to change the ID DGS-1510-28P to the ID:2, select the current unit ID:1 (current unit ID) and as the new ID, ID:2 in the "New Box ID" option and click “Apply” to save the changes (Note: The ID of the unit will be applied after a reboot).
To restart the system enter the top menu:
Tools > Reboot System – Select “Yes” to save changes and click “Reboot”. After reboot, the DGS-1510-28P is assigned to the ID Box 2.
Step 2 - Change priority:
We can also change the priority in the field "Priority” of ID of member, the unit with the best priority will be elected as the master device. A low value means the highest priority. For example; when two switches have equal priority unit, the lowesr MAC address, will have the highest priority. Therefore, the DGS-1510-28P with the lowest MAC: B0-C5-54-92-35-80 .It will become the master device. The DGS-1510-28X will convert into the slave device.
Note: The default priority value is 32, Please check the screenshot below:
Click “Apply” to save the changes and remember to restart for the changes to take effect.
22 Други потребители намират това за полезно.
Беше ли това полезно за Вас?22 Други потребители намират това за полезно.
Благодарим Ви за обратната връзка.
Съжаляваме, че не успяхме да помогнем! Натиснете тук за повече Въпроси и отговори или за да отидете в секция Поддръжка.
Това също може да Ви помогне:
- DGS-1510 Series How to Configure Stack Order and Priority Прочети отговорите
- How to Setup - Asymmetric VLAN with a Corporate and Guest Network – DGS-1510-Series Прочети отговорите
- How to Setup VLANS - Scenario Configuration DGS-1510-Series Прочети отговорите
- How to Configure VLANs – Example (HTTP and CLI) DGS-1510-Series Прочети отговорите