
DSL-2750B Port forwarding for Windows 7
Port Forwarding for Windows 7
Getting Started
Position the DSL-2750B in your desired location, and connect the power cable to the rear of the device. From the ADSL micro filter device that provides the separated telephone and ADSL cables, connect the ADSL one to the grey socket marked DSL also on the rear of the device. Finally, connect a network cable from one of the yellow LAN sockets on the rear of the device to the LAN socket on your computer. It is recommended that you configure the device whilst connected via cable. If you are planning to use the device via the Wireless, set up first your LAN network and your Wireless connection whilst connected via cable. You can then configure the Internet connection via Wireless.
Open the Network and Sharing Centre on your PC and on the left-hand side of the window, click on Change Adapter Settings. Your installed network adapters should now be visible. The Ethernet cable adapter will be called Local Area Connection. If you are using one, there will be another connection labelled Wireless Network Connection. If either is greyed out, right-click and on the menu that appears, left-click on Enable. You will likely only need one enabled at any one time.
Single-left-click on the Local Area Connection and then right-click and select Properties from the menu that appears. In the box that then appears, look for Internet Protocol version 4 (TCP/IPv4) and double-left-click on it. The new box that appears is where you can configure the LAN address settings of your computer. For IP Address and DNS Servers you should select Obtain Automatically. Click Accept (this will close the window) and Accept again on the Local Area Connection properties window (which will close). Your network settings will now be updated.
To access the configuration pages on your device, open a web browser, and in the address bar type the IP address of the DSL-2750B (default address is 192.168.1.1).
Log in (default User: admin; default Password: admin), and go to Setup -> LAN Setup
Port Forwarding
To the Internet your home network has one IP Address, but you may wish to reach more than one device in your network from outside. A Port is a number that you can add after the IP Address that will allow remote access to a specific device on your network. You define which port number goes to which IP Address in your DSL-2750B.
Go to Advanced ->Port Forwarding.
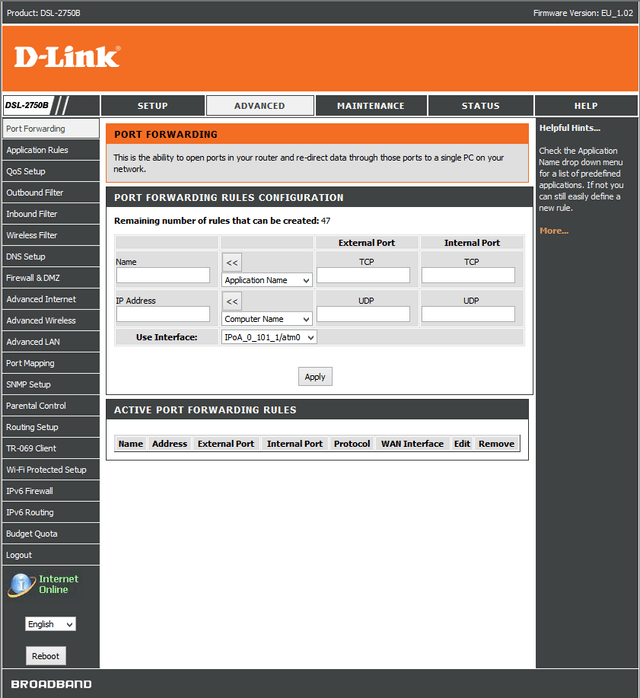
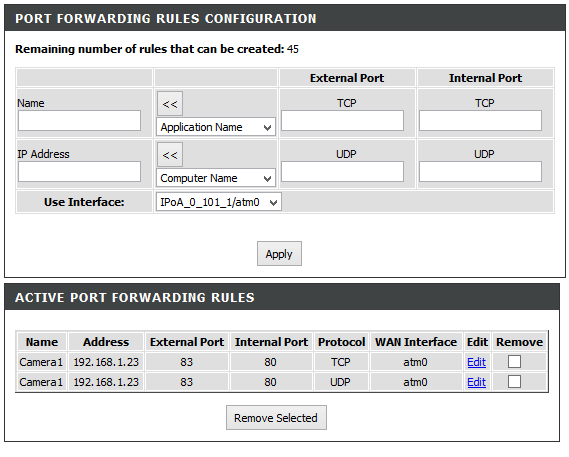
PORT FORWARDING RULES CONFIGURATION
- Name: choose a name for the rule. If, for example, you are defining a rule for a camera, you can write ‘Camera1’
- Application Name: can be used to fill in the Name box, can be ignored.
- IP Address: the IP Address of the device on your network that you want to reach.
- Computer Name: if the device you want to reach is, for example, a computer running a web server, you can use this box to fill in the IP Address box. You can also ignore it.
- External Port-TCP: set here the port number – for example Port 83. Do not use number 80, as this is normally the port your DSL-2750B will respond on.
- Internal Port-TCP: set here the internal port that the device you are connecting to will use – if you are using HTTP, this will normally be 80.
- External Port-UDP: enter the same as for External Port-TCP.
- Internal Port-UDP: enter the same as for Internal Port-TCP.
Click on Apply. Your Port Forward rule is now set.
To use Port Forwarding, you need to know the External (or WAN) IP Address of your DSL-2750B. Depending on the internet connection type that your ISP provides to you, this can change every day. A simple solution to this is to use a Dynamic DNS Hostname. An example of a hostname is www.hotmail.com. Hotmail’s servers are all reachable by multiple IP Addresses, but the hostname covers them all and removes the need to know the IP Addresses.
A Dynamic DNS hostname provides you with the same ability – remember only the hostname, and you have no need to remember or discover your current IP Address. Your ISP can provide you with a hostname for a fee (or a static IP Address – one that does not change – also for a fee). Or you can register for a Dynamic DNS account with D-Link for free – go to http://www.dlinkddns.com for more information.
Ceci peut également aider.
- DSL-2750B Internet Setup for Windows 7 Lire la réponse
- DSL-2750B LAN Setup for Windows 7 Lire la réponse
- DSL-2750B Parental Control Lire la réponse
- DSL-2750B USB Functions for Windows 7 Lire la réponse
- How to open ports on the DSL-2750B? Lire la réponse